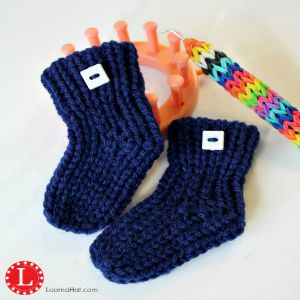
How to Loom Knit Baby Booties with No Holes and No Bulk
Tiny socks are cheap, quick, easy to make and baby booties make great gifts when you add a little hat and pair of no-scratch mittens. On this post you will find a written pattern for the Baby Booties and a video tutorial that is less than 12 minutes but takes you step by step through this fun project. I have put a lot of emphasis on the heel which is the most difficult part of the little shoe. I worked hard to make sure that you would be left with a sock free of holes and bulk, perfect for the baby’s comfort and warmth.
Anyone can manage making a pair. Plus, I assure you that you have enough yarn right now to complete you first pair. In fact you can make them with scraps of yarn. That was what I used to figure out my pattern. How cool is that?
Let me know if you have any questions or comments in the section below and PLEASE share pictures. You can email them to me or post them on our Facebook page.
Pattern for Baby Booties on a Flower Loom
Notes and Materials
Loom: 12-peg Loom. I used the Knifty Knitter Flower Loom
Hook: Any Loom Knitting Hook. I used the Knifty Knitter with a Rubber Band Grip
Yarn: Any Worsted Weight Yarn. I used Red Heart Super Saver. Soft Navy for the featured photo and Bon Bon print in the video.
Stitches: Knit (U-wrap). This is important because if you use the e-Wrap stitch you will need thick yarn or two strands.
Sock Size: 3 to 6 months. To adjust size note that 6 rows equals 1 inch (2.54 cm)
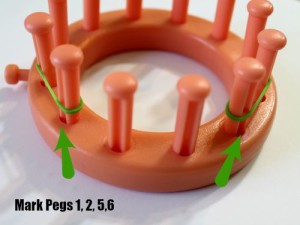
Note to BEGINNERS : If you’re a beginner it’s a good idea to mark your loom. Watch the video tutorial completely before starting your baby booties.
Pattern is FREE on this website. To buy a printable PDF and for more patterns: Click HERE
When you buy a pattern you help support LoomaHat.com and for that I Thank You Greatly.
IMPORTANT Note : you will not be able to right click to copy the pattern, that has been disable do to misuse and unauthorized sharing by other websites and Facebook pages.
Because instead of sharing a link – folks share the pattern.
Cast-on:
Wrap all Pegs – U-Wrap Knit
Cuff:
Rows 1-14: Knit ( 14 Rows )
Fold-up first rows of stitches, mount them back on the loom and Knit-off
Ankle:
Row 15 – 18: Knit ( 4 Rows )
Heel:
For the Heel will be Knitting Flat – Only using 6 pegs on the right side of your loom.
Heel: Decrease
Row 19: Knit 5 pegs then Wrap (half stitch) and turn on peg 6.
Row 20: Knit 4 pegs then Wrap (half stitch) and turn on peg 1.
Row 21: Knit 3 pegs then Wrap (half stitch) and turn on peg 5.
Row 20: Knit 2 pegs then Wrap (half stitch) and turn on peg 2.
Heel: Increase
Row 21: Knit 3 pegs then Wrap (half stitch) and turn on peg 6.
Row 22: Knit 4 pegs then Wrap (half stitch) and turn on peg 1.
Row 23: Knit 5 pegs (Including peg 6 which has 3 loops)
Before you turn – From the inside of the loom – Pick up the top loop from Peg 7 and mount on Peg 6.then Wrap (half stitch) and turn on peg 7.
Row 24: Knit 6 pegs (Including peg 1 which has 3 loops)
Before you turn – From the inside of the loom – Pick up the top loop from Peg 12 and mount on Peg 1 then Wrap (half stitch) and turn on peg 12.
Row 25: Knit completely around the loom
Foot and Toe:
Rows 26-35: Knit (10 Rows)
Cast-off:
Use the Gathered method, as if you were closing a hat.
To Add a Tiny Ruffle to Your Baby Booties
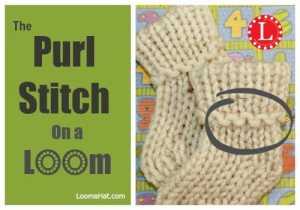
After you finish the cuff add a row of Purl Stitches . Then continue the pattern are written.
Video Tutorial: Baby Booties
.
Below is a 12 minute video. It’s a good idea to watch the video completely before starting the project. Feel free to comment or ask me any questions in the comment section below this post.
To Subscribe to my YouTube Channel: Click HERE
.
Related Posts
Tagged: babies, baby, baby cloths, baby projects, baby shoes, booties, booties with heel, cuff, socks









I have just made my first pair and I am over the moon!
I was really worried about the heel part but your video really helped me.
Thank you so much!
Thank you for the Thank you Buffy !
Absolutely love this video it was so easy for me to follow. My fist time using a loom and it turned out great thanks for the step by step video ????
You are Very Welcome Dana !!!
Have been making hats with e-wrap for awhile now and am finally wanting to learn new things to do. I watched another video on this type of boogie and the lady had me completely lost. This video didn’t lose me and I can’t wait to add the u-wrap to hats now. Also great to know we can sell our completed items since we aren’t selling the patterns. My SIL and I want to do craft shows and I was worried about that. Can’t wait to watch more of your videos and learn more items.
Much Luck – let me know how it goes – if possible share pics 🙂
you are awesome! every time I want to try a new project on my loom I look for your videos. you are clear precise you dont mess around and make it easier to learn with how you show the stitching. thank you!
You are VERY welcome !
Hi Denise, I just finished a pair of these cute little baby socks. The heels came out kinda of okay. LOL I will have to work on that part a little more. I love this pattern. I have started a second pair.
I wanted to share a pic of them but I guess I can’t here.
Thanks for sharing. Take care. 🙂
jlee you can always email me : denise@loomahat.com
Hi Denise,
I just wanted to let you know I tried the pattern for the baby booties, both with and without the purl stitched cuff and I absolutely love them both! I found a non-profit organization who takes knitted items for babies and young children and then distributes them to countries where these children are badly in need. I went ahead and made a bunch of these booties and I am now in the process of creating some hats and small blankets using the methods you teach in your verious, super awesome, video tutorials to send along with the booties. I would just like to give you a big THANK YOU for all of your exellent loom knitting teaching. Especially of your neat, very useful, hints to make my projects come out the best they possibly can.
**TO ALL LOOMERS: I URGE YOU TO STICK WITH DENISE. SHE IS SIMPLY THE BEST!?
Michelle – You are SUPER SWEET – Thank you for all the kinds words and on behalf of all those little souls who have been blessed by your work THANK YOU and Thank you for letting me know that I somehow played a small part.
BIG HUGS !
Hi, I loved the tutorial on the “No Holes Baby Booties!!”
At times it was hard to hear because of back ground music. It (music) was very distracting.
I understand – will be pausing the music more often on the video but I don’t plan to eliminated it all together. Right now I’m looking for a happy medium. I will tell you that you don’t need volume to work the pattern. I write out the steps on the screen. Hey thanks for taking the time to give me this feedback – it’s extremely valuable and your manner in expressing the concern was awesome. THANK YOU
Thanks for the pattern & video. I made a set of these for my mom’ co-worker.
Denise this is not one of your better tuts….you have no close ups and never paused once!
up to now I have found all your tutorials so helpful. Also, I had to turn off the sound as that jazzy sound in the background was too distracting. this way I can’t hear what you are saying…
I hear you – working to find the happy medium – but keep in mind that you can turn down the volume if the music is distracting – every bit of instruction is written out so you can always read if you can’t hear.
Hello Denise. I love the little booties they are so easy my 10 year old son has a knitted a couple. My question is how would I do it to knit a Christmas stocking. I know Christmas just passed but i want to get an early start. :). All the videos I have seen or tried leave a hole on the heel. Can you please help me. 🙂
Hi Liz – LOVE to hear young folks are loom knitting – LOVE LOVE LOVE to hear that young boys are knitting – it’s the reason I wrote the book Liam’s Gift .
Now for the Christmas stocking – take any sock video – use the eWrap version of the knit stitch (creates a wider sock). To avoid the hole remember to pull the last heel stitch up
I Love that little trick about pulling the loop over to not have a hole! The other way I learned was harder, and I always ended up messing up, thank you so much! 🙂
You’re VERY welcome Maria
Denise
Loving this pattern… I have the looms and never really learned how to use them…
So my question is — what if you wanted to make two toned, at what point would you change the colors? At the cuff?
Hi Mary.. there are multiple ways to change colors – In my video on how to make a Comfort Doll I show the easiest way to change colors – plus as a beginner this is a FUN Easy project for you to try later. Click HERE
Hi Denise,
Thank you so much for this pattern and the video! I have tried similar patterns in the past and always messed up at the heel..I actually made the little bootie and it looks just like yours! What a delight. Thank you so much.
JoAnn, Thank you for taking the time to let me know I could help… and yes it IS super cool when you’re finished knitting something and it looks like what it expected 🙂
Wonderful, Denise! I will start making these to go with my hats very, very soon. Thank you!
You are VERY Welcome Margaret and Thank YOU for the Thank you
Hi Denise. Thank you for the pattern and video. Do you know if I can use the KB Hat Loom to make these booties?
Hi Jo, if you mean the Adjustable Hat loom, no it won’t work – to wide.
Hi again. I finally managed to get a Boye Flower Loom (I’m in Australia so there is very little choice in looms) and have completed my first bootie. THANK YOU so much for your videos, patterns and blog. They are the best loom knitting teaching tools on the web.
THANK YOU Joy – someone named you correctly !