How to Loom Knit Baby Booties : Very Cute Very Easy
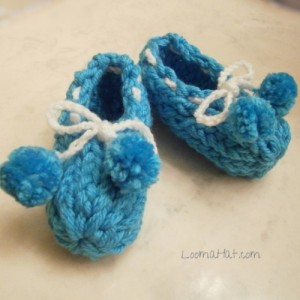 I wanted to loom baby booties for charity. Priority number one was that they needed to be really cute but very simple to make because I don’t like to knit complicated projects and because I wanted to make a lot of them.
Since I didn’t know how to crochet or do regular knitting, figuring out how to do this using the same basic skills I use to loom hats was a bit difficult in the beginning Going back and forth didn’t feel very natural with the first little sock. But, once I got going making these little knitted shoes it was easy as pie. Then I was hook I  wanted to loom baby booties in every color and for everybody, even the dog. By-the-way, even if you can loom baby booties for the dog you should reconsider. I don’t think they like the feel of the yarn. Any way, that’s another story for another day and another project. If you do make some for your dog or cat, PLEASE send me pictures!
Supplies Needed :
Flower Loom, Hook, Baby Yarn, Yarn Needle, Scissors
You can click the picture to purchase any of the supplies:
Loom: The Flower Loom
You will be needing a flower loom for this project. I use the Knifty Knitter 4-1/2 Inch Flower Loom however other name brands make the same loom with minor, non-consequential differences. The loom might to blue instead of orange. If asked to choose another easily available flower loom I would choose the Boye Flower Loom . In reality, the brand name, color or price is really not what’s most important. What you’re looking for is the number of pegs which is 12. In face even if the loom has 1 less peg or one extra peg, that is not a big deal.
By-the-way, this little loom is used here often.
The Simple Pattern: Beginner Easy
Note: Use Baby Yarn.
E-wrap stitch only. 9 rows for the heel and 7 rows for the front pad of your foot.
1. (Cast on) Using two strands of yarn of if they were one go counter-clockwise. Wrap each peg once. Stop at the last peg– ( do not complet the circle. There should be a gap between the two front pegs- see picture below) change the direction of your work- now wrap each peg going clockwise – You should have four strands on every peg. Two on the bottom and two on the top
2. Knit (e-Wrap Stitch) Pull the two bottom strands over the two top and flip over the back of the peg. – Do this for each peg.
When done – you’ve finished row 1. Repeat- You need 8 more rows for the heel.
3. When you’re done with that 9th row you will then begin to work ONLY in a counter clock-wise direction. Wrap ALL pegs twice. You should have four strands on every peg. Two on the bottom and two on the top
4. Knit (e-Wrap Stitch) Pull the two bottom strands over the two top and flip over the back of the peg.
Do 9 rows in total for the front of the foot.
5. Close the front of the booty using the gathering method. As if closing a Hat:
6. Thread the needle with yarn. Sew the open part of the heel closed.
7. Decorate – if you want to.
The Video: How to Loom Knit Baby Booties
Note: At the end of this page
You will find a video on how to make the tiny pom poms you see in my Loom Baby Booties picture. There are dozens of ways to decorate them but keep in mind that depending on the age of the baby they do like to put their feet in their mouth. Don’t use buttons or artificial flowers. They look very cute on the loom baby booties but can be harmful. Even the pom poms can be a problem. I have placed them on the booties in my picture only for to get your attention I don’t put them on the socks I make for charity.
Note: At the end of this page
You will find instructions on how to make an adult pair. It’s important to know that the small 24 peg loom is what is use to make the adult size version of the loom baby booties.
It’s best to watch the video in it’s entirety before you even start to gather the supplies for your loom baby booties project. Although it’s fairly simple, you want to get familiar with the technique first. This will keep your level of anxiety low from start to finish.
 If You Have NEVER Ever Loomed
If you have never loomed anything ever, it may be best to try to loom knit a little brimless hat first to get acquainted with a loom and hook. Note, this is not a Must, just an opinion from personal teaching experience. On the right sidebar of this page is a little black box with a video on how to loom knit baby / preemie hats. It’s only a few minutes long.
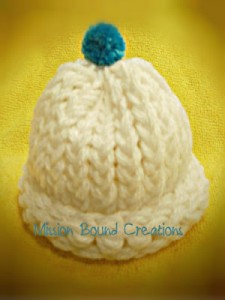
Bye-the-way, the picture shows a hat that only looks like it has a brim. It is knitted brimless and when the hat is finished the bottom is folded up to create a softer brim.
One bonus to making the hat , you’ll have a great gift once you loom baby booties and make a matching hat.
But if you feel that you don’t need to do that then dive in. Below is the Loom Baby Booties video !
Learn it really well so you can make extras and send them to great non-profit organizations like Reliefshare.org, your favorite charity, homeless shelter or your local hospital.
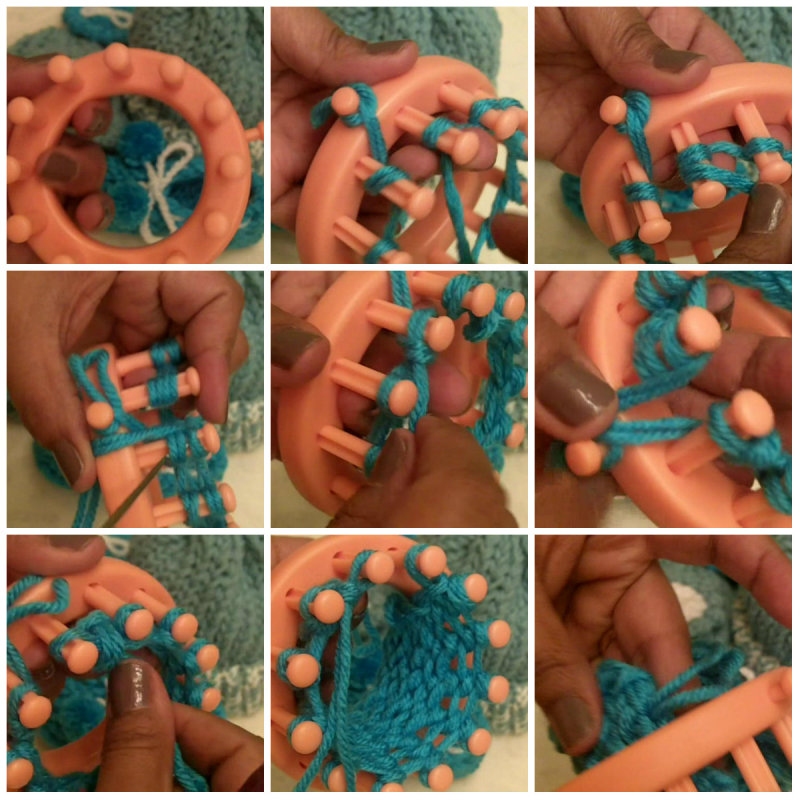
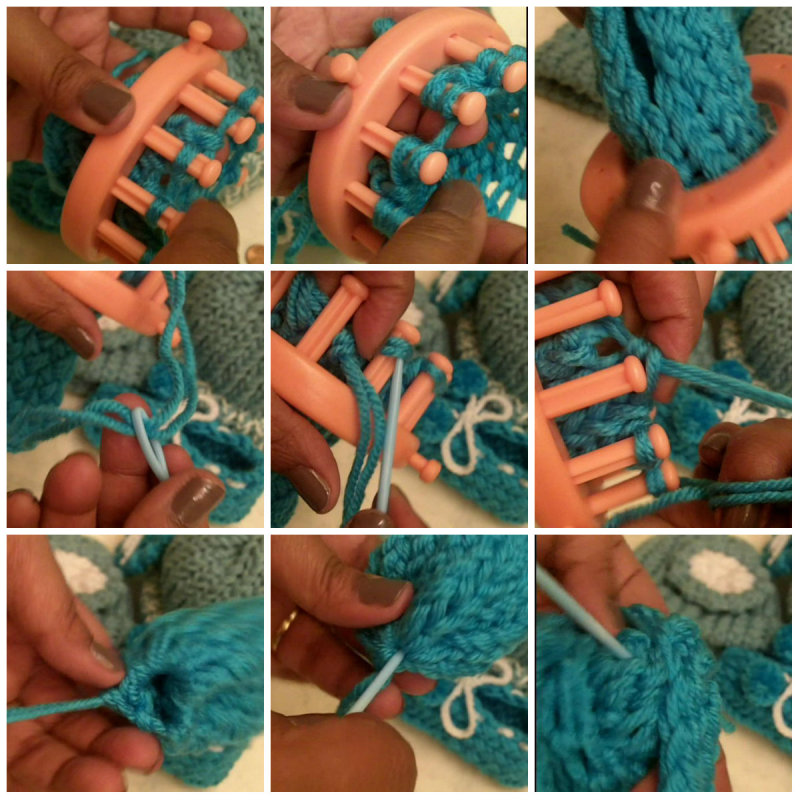
Picture Tutorial Part 1
1. Get your Flower Loom
2. Take two strands of yarn, wrap the yarn around the pegs going around the loom but stopping at the last peg without completing the circle. There should be a gap between the two front pegs.
3. Turn around and wrap pegs in the opposite direction
4. After you have wrapped all the pegs twice (leaving an opening in the front) get your hook and start pulling your bottom two strands over the top two strands and over the pegs.
5. When it’s time to wrap, don’t loom the first peg, start with the second. Wrap all pegs like before. When you reach the front grab the hook and start pulling the bottom strands over the top two strands and over the peg.
6. Continue knitting. You need 9 rows to make the heel.
Picture Tutorial Part 2
1. Now you work on the front of the foot. You start by wrapping all the pegs.
2. This time you go completely around
3 . You need 7 rows for the front foot part of the booties / sock
4. When you have done your 7 rows.thread your yarn needle.
5. Find the dent in each peg. Put the needle there to get to the yarn.
6. Push the needle upwards to pull the yarn loops off the pegs. Start to gather the loops.
7. When you have pulled all the loops off the loom your booties will come off the loom. Grab the two left over yarn strings and pull the front of the sock shut.
8. Put your yarn needle through the hole and turn your work inside out
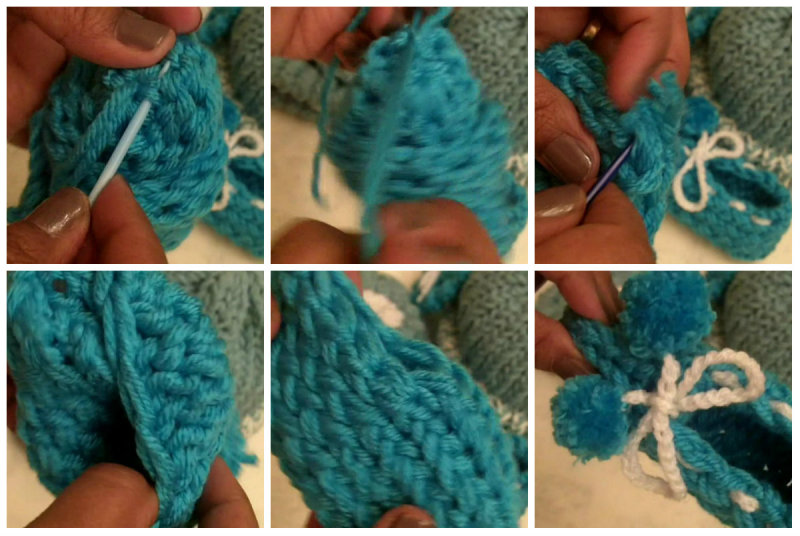
Picture Tutorial Part 3
1. Sew the hole shut
2. Make a knot
3. Sew the heel closed
4.. Turn the sock back – outside in
5. Admire your work
To Make an Adult Version of the Loom Baby Booties
Get a ruler or measuring tape. You have to divide your foot into two parts, the foot and the heel.
I will use me as an example. My foot is 8 inches ( i’m a shorty). I divide it like this: 3 inches for my heel and 5 for my foot. Remember that the formula is based on using worsted weight yarn (thick yarn) and two strands.. so for my heel I would loom knit 12 incomplete rows and for my foot 20 complete rows.
Once you loom baby booties if you still want to add little pom poms below is a video that shows you how to make tiny pom poms with a fork.
Related Posts
Tagged: baby, baby booties, baby projects, booties without heel, charity, easy knitting, loom, loom knitting, Loom knitting projects












Hi Denise:
I am trying to make footies or booties for a toddler, I can only find baby’s and adults. What size round loom would I use to make footies or booties for a toddler between the age of 2-4 years old.
Hi Sarah – that size requires a specialty loom – here is a video by Scarlett Royal that may help : https://www.youtube.com/watch?v=7ontV7mAZK8
For the adult version do you still use the flower loom?
No you need the 24-peg loom
Doing adult or kids do I still use the twelve peg flower loom? Then use your measuring example?
No Marilyn – for adults see this pattern: Click HERE
about how many inches is the top of the bootie from the bottom of the loom?
Hi Sunny soooooooooorry for the delay…. I don’t have these anymore. I would tell you that every 4 rows is approximately 1 inch
this is great, I can see where I will also be hooked. Denise, are you still going clockwise and counter clockwise around the entire time?
Hey Sunny sorry about the delay – not really understanding the question. If the question is about the flat portion of the booties – yes I go both directions on that part of the pattern
Hi, how did you do the decorations? Because I made some, and I really like the decorations! Thank you so much!
If you mean the Pom Pom – here is a post: Click HERE
Thank you! Oh one quick question, do you have a shawl pattern?
No yet – working on it – hopefully for April. Thanks for asking 🙂
Denise Thank you so much for your tutorials on looming. I’ve learned how to loom by watching your tutorials.I’m still a beginner but I’m getting much better. I’m hooked on looming & I love working on my projects. Thanks again & as us loomers say Happy Looming, and have a blessed Thanksgiving . ??
THANK YOU Debbie !
I have been watching the booty video and it does not match the written directions, The written says 7 rows and then 9 rows but in the video you say nine and then 7?
Hi Teresa its 7 rows for the heel and 9 rows for the front pad of the foot.
Ok – I’m confused. I just finished my 1st pair of booties, meticulously following your videos. Please clarify if I should be following the 9 penny and 7 dime counting method, or the opposite. Thanks!
I did that video several years ago and don’t quite remember it but its – 9 rows for the heel and 7 rows for the front pad of your foot.
Thank you for the easy to follow videos!
You’re VERY welcome !
love the video but your work slipped away from camera a few times.
I really enjoy your tutorials but please adjust the camera so that the work is in view.
This is one of my first videos… things have changed since then. 🙂
How much yarn do I need
About 50 yards
it do not say how many rows to knit till you get to the heel, I think 10 row am I correct?
Hi Carmella, sorry for the delay in responding I’ve been ill for a bit. Just trying to catch up. I normally knit 7 for the heel. That can be adjusted depending on the baby.
Hope that helps,
denise
Hi Denise,
Your video was so helpful, I know now how to make baby booties! So far I have made several pairs from this video. Thank you so much for sharing your talent with us.
For the adult size slipper, could you break down the number of pegs to use at each step in the pattern? Rows, I can figure out, but I can’t seem to figure out the stitches. I can’t emagine that it would be the same as for an infant.
Hi Linda, for the adult you would need to use the blue loom and do the same pattern as the baby. Flat knitting for the heel – circular knitting for the foot. If you’re using worsted weight yarn and the basic knit – 4 rows per inch is average.
Hope that helps.
denise
Hello!! What size are these?
Depending on the baby 4-6 months
Hey Denise, I would like to make a toddlers footie or bootie, all I see is measurements for baby’s and adults. I cannot find the age group of 2-4 years old, which round loom would I use for toddlers . 12 or 24 round loom.
Could not get the video to play.
It says video currently unavailable.
Hey Terry, it may have been a tempory glitch. I took a look at it.. Seems to be working fine.
Hi!
I love this design and pattern, but in Oz and our wool etc is a bit different, and I found even with three threads it was too gappy and little toes could get caught.
I’ve changed to knit stitch and tried to fixed the tension difference, but have no idea what size I should be making this booty!
Could you please let me know the measurements of the completed booties, pretty please!
Thanks!!!
Sorry for the delayed reply… the little booties in the post were donated. Best thing to do is to follow the formula in this post https://www.loomahat.com/how-many-rows/
Hope that helps
i sure l;oved you videos i made a booty while waiting for my husband to get out of drs office (15 min) i was impressed how it turned out, i sewed the toe opening up great so far but i dont have a heel to sow up just opening at top. what have i done wrong, loved the video
Hey Pat.. thanks for the positive feedback. Question – Did you knit a complete circle? … the key to knitting the heel is to knit back and forth without knitting a complete circle on the loom. Look at the pictures on the article. I think this gives you an additional perspective on the project. Hope that helps.. let me know.
Keeping socks on your baby’s feet is no simple task. One little kick, a tug at the toes and they’re off. And of course it’s always one sock from every pair that gets lost!”
Hello there! Do you use Twitter? I’d like to follow you if that would be ok. I’m definitely enjoying your blog and look forward to new updates.
HI DENISE:
I CAN ONLY LOOM KNIT BY WATCHING VIDEOS. I CAN’T READ PATTERN NOR CAN I FOLLOW PICTURE OR WRITTEN TUTORIALS. I CAN MAKE A HAT, SCRAVE, BLANKET,
SOCKS, SLIPPERS BABY BOOTIES. I WOULD LIKE TO LEARN MORE BY WATCHING THEM ON VIDEO. I LOVE YOUR VIDEOES. CAN YOU PLEASE SPEAK A LITTLE LOUDER.