The VERY Important Purl Stitch for Beginners
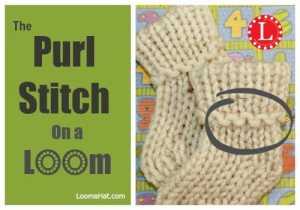
Regardless of the tools you use to knit your fabric you must know the purl stitch. Here is a step by step, text, picture and video tutorial to break it down to bite size pieces for loom knitters.
It’s not difficult, but it’s not as easy as the e-Wrap most loom knitters learn first and can seem a bit confusing. Then add to the confusion that the True Knit stitch is so similar. The wrong placement of the yarn causes a whole different look.
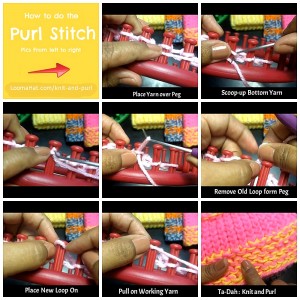
The Purl Stitch in Simple 5 Steps
Below is the picture and text tutorial. If you prefer a video continue to scroll to the bottom of the post.
- Place the working yarn ABOVE the existing loop
- With the loom hook – scoop up the working yarn to create a loop
- Grab the new loop with 2 fingers and pull to upwards and back to Remove the loop that is on the peg
- Place the new loop on the peg
- Pull the working yarn.
The Importance of Yarn Placement
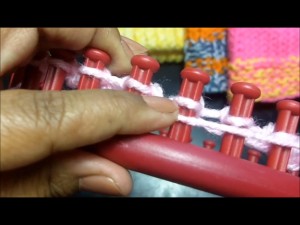
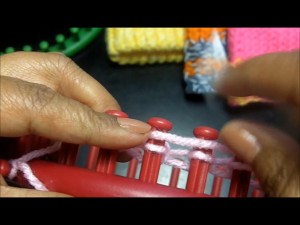
You must remember to place the working yarn under the existing loop and scoop from the top, see figure 1. If you place the yarn under the existing loop you will be creating a Knit Stitch which has a very different look, see Figure 2.
Figure 1 : PURL Stitch
Figure 2: KNIT Stitch
Video Tutorial for The Purl Stitch
Below is a short 1:23 min step by step video on how to do the purl stitch. It’s a good idea is to watch the video completely before trying the stitch. This is a recommendation I make with all projects.
Once you have learned this stitch there is a huge list of stitches and project patterns you can now manage easily.
Don’t miss any of my upcoming videos
To Subscribe to my YouTube Channel: Click HERE
For More Stitchess: Click HERE
To Support LoomaHat.com for just $2 and get a PDF Pattern in Your mailbox every month: Click HERE


Thank you. I must say first I HATE KNITTING. I learnt to knit as a child, i am able to do all the stitches read patterns etc, my mother was a lightning speed knitter. She used to make knit 6×6 squares for blankets, which were made into donations for the church. a worthy cause, but guess who had the job of winding balls, and sewing in ends. i crochet also but i enjoy that, it grows faster.
just for fun i tried these looms, they grow fast, dropped stitch is not a major reconstruction project.
your info and tutorials are great, i have learned (learnt is the correct term but spellcheck says not. But I am British LOL language barrier?) a great deal from them. Think I may subscribe, but I have a billion patterns for loom knit and crochet i need to organize. But love your site and vids, best I have found so far. Thank you very much for your time and patience.
Thank you Shirley – you are too funny !
Denise,
My good friend want a newsboy hat with short brim/visor..
Do you have a tutorial? Or do you know a good one?
I have long loom kit as well as the three boyles loom largest 36
She has a bigger head.. Can you help?
Loretta – hats can be made on long looms but it takes sewing and shaping not easy for even advanced beginners. Your 36-peg loom is too small for this project – especially if your friend has a big head. I would ask her to go to eBay and purchase the 41-peg loom – you can get it REALLY cheap. Here is some info: Click HERE . I’m not a fan of Boye – for my review Click HERE . Then here is a list of hats – you should find 2 options – Click HERE
Are those cute little booties loomed, Denise? Can you point me to the pattern even if they AREN’T loomed? Thanks for all your work to help us visual learners!
Hi Margaret, they are loomed. I was testing some techniques for my next pattern with video. Both will be available to you tonight or in the morning. Stay with me. It’s on the way. 🙂
By the way, Thanks for the Thanks – ALWAYS much appreciated.
Cool! And thanks again! ?