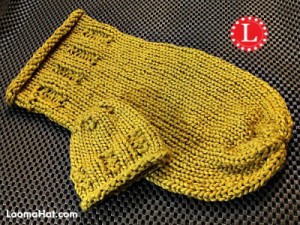
Baby Cocoon and Hat on a Knitting Loom for Newborn and Preemie
I was inspired by some awesome grand-moms to be to do a simple, basic and cozy baby blanket. I decided on a pattern of my favorite which is a Baby Cocoon (sometimes misspelled cacoon ) because it so closely resembles a mother’s womb. I got busy on A LOT of research before actually starting on the design. I didn’t want to make one just for decorative or propping purposes but instead for practical, functional and safe use with a newborn.
Below you will find some of my research information as well as the 4 FREE patterns, 2 Cocoons and 2 Hat patterns and a step by step video tutorial easy enough for beginners.
Baby Cocoon Design and Safety Considerations
The Blanket Type: Swaddling your baby in a blanket is not new, It’s been around for centuries. It’s not just cute, it soothes babies making them feel comfortable, safe and warm. Unlike a conventional swaddle blanket where you need a complete lesson to get the baby situated the Baby Cocoon gives them the snug feeling they want without all the fussing you don’t need.
The Baby’s Size: According to BabyCenter.com the average baby born at 42 weeks of gestation measures 20.28 inches or 51.5 cm. The weight of these babies averages around 8.12 lbs or 3685 grams.
The Baby’s Comfort: Long enough to give room for kicking but short enough for the baby to feel like he or she kicking something. Should not be around the babies neck. It should allow space for little hands to come out so that the baby can suck on fingers and self-sooth.
Best Baby Cocoon Dimensions: According to ReliefShare.org , (a great charitable origination whose volunteers knit and sew baby cocoon to give to local hospitals) below are the general sizes.
Note: Information was copied with permission for ReliefShare.org. I crossed out the stitch numbers because they don’t apply to loom knitters. See Stitch Gauge for loom in the Pattern.
The Baby’s Weight for the General Sizes are:
XXS – 14″ long x 50 stitches wide (6″ across) – 12″ diameter 1.5 to 3 lbs
XS – 16″ long x 60 stitches wide (8″ across) 3 to 5 lbs
S – 18″ long x 70 stitches wide (10″ across) 6 lbs to 8 lbs
M – 20″ long x 80 stitches wide (10″ across) 9 lbs to 11 lbs
L – 23″ long x 80 stitches wide (12″ across) 12 t0 15 lbs
XL – 25″ long x 80 stitches wide (12″ across) 15 to 17 lbs
Gauge: 4 Stitches and 6 Rows = 1 inch . Note that 1 inch is equal to 2.54 centimeters.
ReliefShare.org also states that most hospitals and parents prefer the Small sized blanket. That makes all the sense in the world. So if you plan to make these for charity – do the small size which follows the pattern here on this website, 18 inches long and 10 inches across.
For the Hat I used the Size Chart in the Newborn Hat Pattern on this website: Click HERE
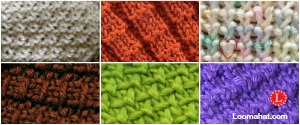
Stitch Pattern: I have had a great time learning and converting a lot of stitches that I would love to use on a baby blanket. Like Theresa Higby’s Tiny Heart Stitch, the Linen stitch and my latest Bamboo stitch. But, I wanted something that was easy enough for beginners and safe enough to wrap a precious baby in worry-free. I needed an easy dense stitch with a little bit of stretch. I BIG time considered the Andalusian stitch and then thought that instead a basic Knit Stitch with a little bit of Rib Stitch for decoration would be better.
I decided to go simple – a pattern made up of just Knits and Purls.
Yarn – To Baby or Not to Baby : This is was almost painful. I couldn’t decide on something cute, comfy and safe for a newborn. I was hoping someone would do it for me. Then, Llike Dah someone already did it’s called Baby Yarn. But no, believe it or not I didn’t like any of them for this project. I wanted density and softness. I found the happy medium by combining a fluffy yarn with a soft yarn.
A Few Safety Considerations: Like with everything that has to do with a baby Please use caution and Your own good, sound judgment in using this type of blanket for your child. In general a Baby Cocoon is not good for sleeping if your baby can turn ( Best if Used for Carrying, Holding and Transporting ) and Not Good for Bigger Babies. Make sure not to cover the baby’s face with the blanket.
Let’s Get to the Patterns
Baby Cocoon Loom Knit Patterns
Pattern is FREE on the website. To Purchase a Printable Version: Click HERE
Supplies
Loom: 40-41 peg loom for the Cocoon and 31-peg for the Hat. I used the Knifty Knitter brand. A good alternative to the Knifty Knitter is the Darice Loom Set or Michael’s Loops and Threads.
For the X(XX)Small Version use 36-Peg for the Cocoon and 24-peg for the Hat and adjust the number of stitches per pattern section. Watch the video for the XXS Pattern.
Hook: Any loom knitting hook. I used my old Knifty Knitter with a Rubber Band Grip
Yarn: This one is important. I tried 5 , knitting and then frogging my work before making a decision. Scroll up and see my notes above. I finally decided on Lion Brand’s Natures Choice Organic Yarn in Mustard. I used approximately 120 yards. Note that each skein has 103 yards.
Notions: Yarn Needle and Scissors
Stitches: Knit and Purl
Gauge: 4 Stitches and 6 Rows = 1 inch . Note that 1 inch is equal to 2.54 centimeters.
Pattern for Newborn Cocoon
This pattern is for the Small Version which works for the average newborn (10 inches across and 18 inches long) . For other sizes use proper sized loom and add or subtract rows to each section as needed. See the Stitch Gauge and the ReliefShare.org Size Chart above to help with pattern adjustments.
Cast On: Wrap all your pegs then Flat Stitch the row.
Top Brim of Cocoon = Approximately 4 Inches
Rows 01 – 12: Knit (U-wrap)
Rows 13 – 24: Knit 2, Purl 2
Bottom Body of Cocoon = Approximately 14 inches
Rows 25 – 104: Knit (U-wrap)
Rows 105 – 108: Knit 2, Purl 2
Cast off: Gathered Method
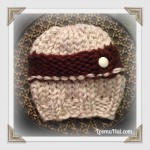
Pattern for Newborn Hat
This pattern is for a Newborn Hat about 6 inches in length.
Cast On: Wrap all your pegs then Flat Stitch the row.
Crown and Brim of Hat = Approximately 2.5 Inches
Rows 01 – 08: Knit (U-wrap)
Rows 09 – 16: Knit 2, Purl 2
Hat = Approximately 3.5 inches
Rows 17 – 33: Knit (U-wrap)
Rows 34 – 36: Knit 2, Purl 2
Cast off: Gathered Method
========================================================================
Pattern for Preemie Cocoon
This pattern is for the XXSmall Version (7 inches across and 12 inches long) . For other sizes use proper sized loom and add or subtract rows to each section as needed. See the Stitch Gauge and the ReliefShare.org Size Chart above to help with pattern adjustments.
Cast On: Wrap all your pegs then Flat Stitch the row.
Top Brim of Cocoon = Approximately 2 Inches
Rows 01 – 08: Knit (U-wrap)
Rows 09 – 16: Knit 2, Purl 2
Bottom Body of Cocoon = Approximately 4 inches
Rows 17 – 69: Knit (U-wrap)
Rows 70 – 72: Knit 2 , Purl 2
Cast off: Gathered Method
Pattern for Preemie Hat
This pattern is for a Newborn Hat about 4 inches in length.
Cast On: Wrap all your pegs then Flat Stitch the row.
Crown and Brim of Hat = Approximately 1.5 Inches
Rows 01 – 05: Knit (U-wrap)
Rows 06 – 10: Knit 2, Purl 2
Hat = Approximately 2.5 inches
Rows 11 – 21: Knit (U-wrap)
Rows 22 – 24: Knit 2, Purl 2
Cast off: Gathered Method
Baby Cocoon Video Tutorial
I always recommend watching the video tutorial completely from beginning to end before starting the project. This will give you a better sense of security that the project is doable and will help the knitting process go faster.
Don’t miss another video tutorial. To Subscribe to my YouTube Channel: Click Here
.
.
====================================================================
.
Related Posts
Tagged: babies, baby, baby projects, bag, blanket, blankets, cacoon, receiving, sac, sack, sleeper, sleeping bag, snug, snuggie, snuggy, swaddle, swaddler, throw








Hi. I had seen this video awhile back but didn’t remember everything you did so I started doing it just like a regular hat. Have you done one like that and it work ok for a baby. I hate to undo it since I’ve already started it. Also, just love your site!!!
Belinda, sorry about the delay. I have made just regular ewrap hats for babies depending on the yarn -it works out fine but haven’t made one in years.
this is for sherrie. i’m assuming u meant that u marked every 2 pegs to indicate what stitch to do. u should have 3 pegs at the end because 41 is not divisible by 2. if doing k2, p2 rib then u can end it k2, p1. hope this helps.
Which size of loom do you use for the baby hat? It is for a newborn.
Here is a post with a pattern and a size chart: Click HERE
Hi Denise,
I was going to make the baby cocoon on the 41 peg loom. I banded every 2 pegs for the purl knit but ended up with 3 empty pegs at the end. Is this correct? I’m not sure why to do.
No – you should not have empty pegs – not sure what you mean when you say banded. Do you mean bind-off?
Which size of yarn do you take?
I used a medium size #4 worsted weight yarn
For size M what size loom
Best to use the 40-41 peg loom for any baby other then a preemie or newborn
I’m using a 41 peg loom, when I get to the 2ND section double ribbed pattern where you knit 2 purl 2 I have an extra peg at the end because of the 41 pegs. Does the double ribbed pattern not work for an odd peg loom or is there another way to do this pattern for the odd pegged loom? Thanks so much.
Yes and No – The double rib is a 2×2 so the odd number loom gives you an extra peg – so No (but) just add an extra knit or purl no biggy make that the back and you wont even notice so Yes
Thank you so very much for the info! Have a wonderful day.
Could you please tell me how many skeins or yards of yarn it took to make the cocoon and matching hat. I know its #4 yarn 1 strand.
Hi Judy – thanks for the question – I missed that information – I used about 1 skein and a 1/4 – approximately 120 yards
i do not wrap the entire loom at one time but wrap several pegs, 3, 5, 6 (whatever u feel like) and i do not get the line of loose stitches. if u watch tuteate who does great videos on youtube she wraps in the same manner. this seems the easiest. hope this helps.
Denise, I have watched many of your videos and have made baby and adult hats but I still have one big problem every single time. Can you perhaps tell me what I am doing wrong. The only difference in our looms is that my anchor peg is located right below a regular peg and not between two pegs as yours. I’m using e-wrap and regular knit – hook bottom over top. When I first start the wrap after anchoring down, and then go around twice – it’s extremely difficult to hook over the first knit. After the hat is completed, I have a whole area which looks holy and loose which makes for an imperfect look.. This area appears stretched out. Hope you can help – I really think you are one of the best instructors online. Thank you.
Hi Irene – with the e-Wrap every time you start a new row. Here is a link to a forum conversation on this subject: Click HERE
Irene, I always had this problem on anything I did in the round where I used e-wrap. It’s a wide bad looking, very loose thread between the last peg and the first peg. I tried having a different starting peg on every row but that loose area followed all the way from the brim to the crown. If you use the U-wrap or Flat knit on every single peg you will not have that bad looking stitch. It only happens with items I the round. Since I started using U-wrap on every peg I no longer have this problem. I hope this helps.
if you don’t want to use u-wrap or flat knit since it will make your project tighter you can use the ewrap but only wrap 1 peg to a few pegs at a time. since you are not stopping and starting at the same peg you will not get the space. hope this helps.
Thank you for this pattern. It is wonderful. Also, thank you for all the information on what is best and safe for the different sizes. This has been a worry for me when thinking about making cocoons for a baby.
You’re VERY welcome and Thanks for the Thanks !
nature’s choice is a worsted – with the u or flat it appears to come out tight enough. how come u did not use a chunky? thanks for sharing pattern and all the info. informative.
I didn’t want the sack to be too bulky.
Denise Thank for sharing these patterns you really inspire a lot of us visual learners and by you make these videos it opens up many doors for us and helps us overcome our fear of messing up and having to frog our work. We are able to understand a pattern more by seeing how they done so thank you very much
Thank you for the Thank you Sherri… I REALLY appreciate it !
Denise when I started reading your story about baby cocoons, and then seeing the beautiful cocoon and hat that you came up with it brought tears to my eyes. I’ve been looking thru different tutorials and searching for patterns but wasn’t coming up with “just the right one.” This one is absolutely beautiful and I will definitely be making this set. This Grandma has had many a tearful day since our daughter found out she was pregnant with her miracle child. In 1997, after a third try with fertility drugs for nearly 2 years she was told she would never have a child. At Easter she had a positive pregnancy test. She is 12 weeks with a very active fetus and called me this morning to tell me she felt the baby move for the first time. So yeah I’ve been in tears a few times again today. Thank you for this beautiful pattern. She will find out the gender, hopefully next week and then I can get the yarn for this. You are just awesome and I can’t thank you enough.
Thank You Debbie,
I’m VERY glad to know you liked you.
Big Hugs G-mom !