Three Step Stitch on a Round Loom
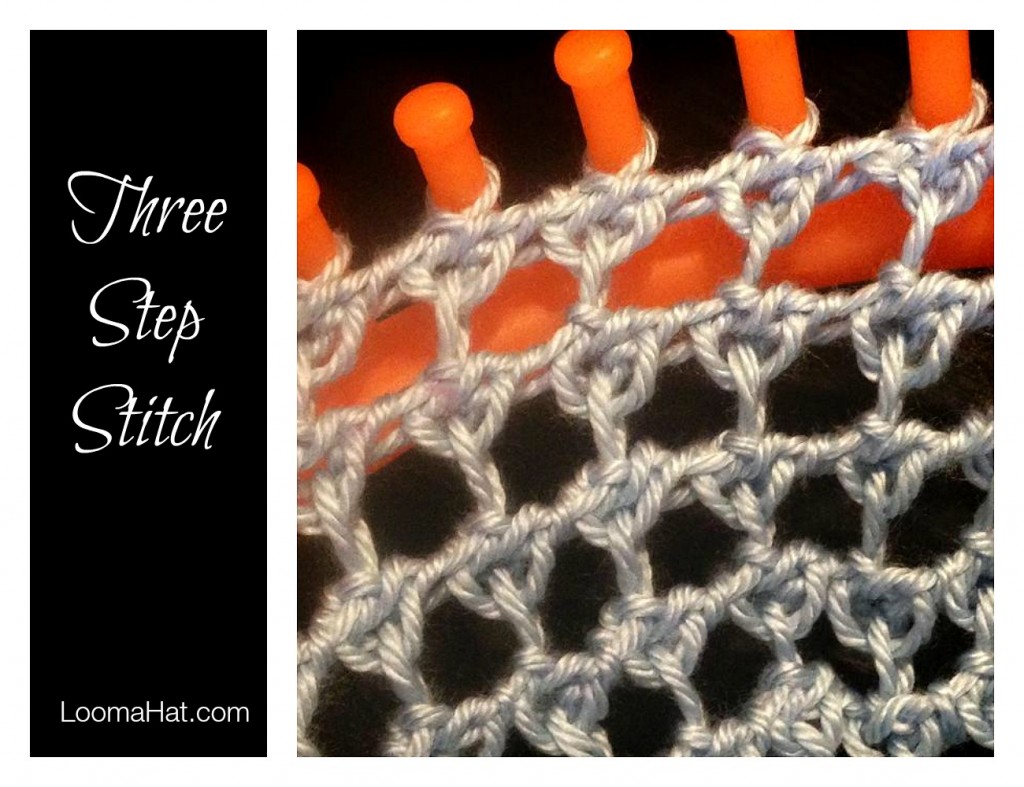
The Three Step Stitch is the best looking loom knitting boo-boo I have ever seen. I first saw this stitch on Karen Aicken’s Pinterest board. Zoe MacLean created this beauty when she got confused on how to knit the Mock Crochet stitch. I just love it when things like this happen, don’t you. Especially because some people think only perfection works wonders.
Yet some of this worlds best creations are a result of human (the best creation EVER) error.Like sticky notes and chocolate chips great creations stand alone as ingenious products. To the point that the average person never finds out the original intent of the creator.
Thanks Zoe, I wait anxiously to see your next wrong turn. And without further ado… lets break down the Three Step Stitch in Four Easy to Follow Steps.
Para Instrucciones En Español: Haz Clic Aquí
For a VIDEO TUTORIAL Scroll to the bottom of this page.
Step by Step Instructions for the Three Step Stitch
 Zoe knits this stitch very loosely. This gives a more elongated look. I prefer to tighten mine especially if I’m using a thin yarn. This gives the stitch more of a “tulip” look. Such was the case with the slouchy I made using the Darice Loom which is a large gauge loom and Caron Simply Soft worsted weight yarn in a Light Blue. I thought it made for the perfect Spring / Summer hat.
You can also consider trying thin yarn using the technique of Knitting with Two Strands as One.
Note that in this article and the corresponding video I will be explaining how to do ONLY THE THREE STEP STITCH. This is not a pattern so I begin the lesson with the first step for the stitch.
As far as the direction of your knitting, it is not relevant. You can be knitting clock-wise or counter clock-wise the instructions remain the same.
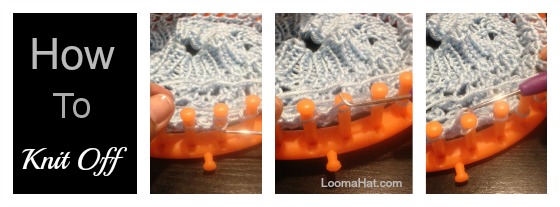
First things First – I will say ” Knit Off ” after every step – below is a picture of what “Knit-Off” looks like.
Step 0.
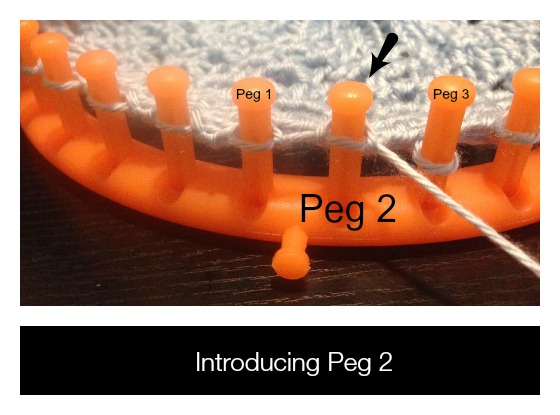
Find the PEG with the working yarn. Lets call it PEG 2. Consequently that makes the peg to the right of it PEG 1 and the peg to the left of it PEG 3.
Very Important: PEG 2 will always be the peg with the working yarn at the start of every stitch
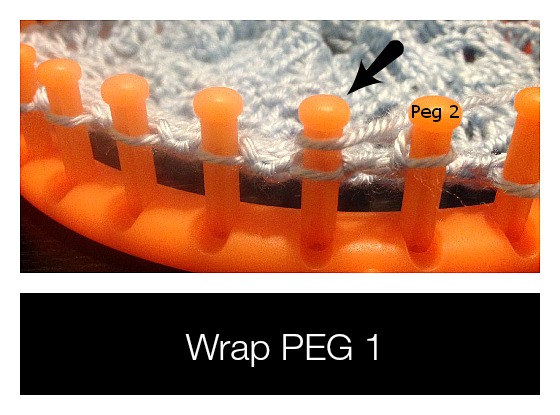
Step 1.
Wrap your working yarn around PEG 1 – knit off.
Step 2.
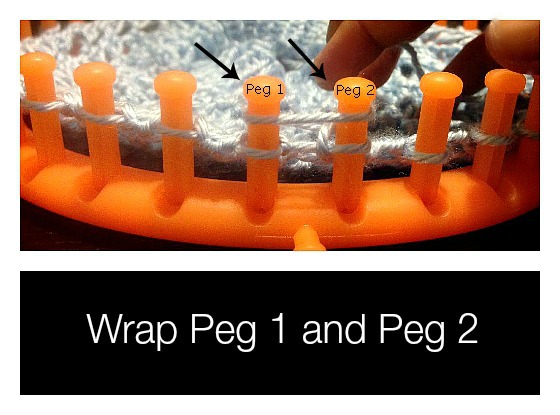
Wrap your working yarn around PEG 1 and PEG 2 ( yarn “across” both pegs not e-wrap ) – knit off.
Step 3.
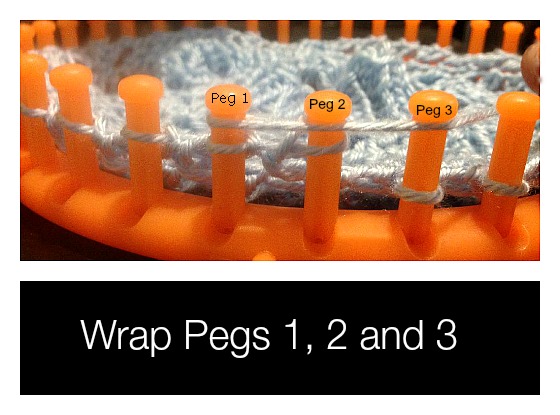
Wrap your working yarn around PEG 1, PEG 2, And PEG 3 ( yarn “across” ALL pegs ) – knit off.
Repeat as many times as necessary. The Three Step stitch is time-consuming but it makes such long stitch that you knit less rows. You can finish a hat after just 6 – 8 rows of knitting of the Three Step Stitch after the brim.
Hope you like this stitch as much as I did. Feel free to leave me any questions or comments in the section below.
For MORE STITCHES: Click Here
Below are Just Some of My Favorite Books: Click Image for Link
Video Tutorial for the Three Step Stitch
Related Posts
Tagged: round loom, stiches











Great tutorial, I have made a beautiful sweater with this stitch
Just new at looming. Never thought I would be doing this. Love it, so relaxing.Would love any input you can give me. Have got two other ladies also looming now. So far I have made a infinity scarf and a hat with a pom pom . All turned out great. Thanks s to all. Sherr
Would you please start from the very, very beginning so that I may learn how you made this project. Thank you.
Gladys, this is not per say a “project” – I’m only showing you the stitch. YOUR project determines the cast-on (start). Here is a post that better explains: Click HERE
Do you have a tutorial on how to cast on and bind off for this stitch? It is a lovely stitch and I can hardly wait to try it.
Thanks in advance.
Melanie the cast on and bind off are not determined by the stitch but by the intended pattern – Here is some information: Click HERE
Could you show a pattern for this stitch using a long loom to make a scarf? I am new to all of this and need step by step directions. Your instructions are the best!!!
I have not – but vegangelist on YouTube did : Click HERE
Can this stitch be done on a straight loom going back and forth instead a round loom??
Yes – just add edges – when you turn it’s like you started from the very beginning
How would I add edges… Not sure if I understand….. I’m visual.. Is there a video I can watch?
See this 2 post for ideas : How I start my stitches and the basic scarf pattern
1. Click HERE
2. Click HERE
I want to learn different hats, scarves it seams everything doesn’t go into how to do it..
Julia, Here are 2 post for beginners: for the Hat Click HERE and for the Scarf Click HERE
Hope that helps
Great tutorial. I can’t wait to try it. I’m a visual learner. You are a good teacher.
Thank you !
I love this! I just made a mini version on the small loom for my daughter’s American Girl doll and it’s perfect! I want to make one for myself too! I have one question (as I didn’t pay much attention to the tiny hat): Does this stich take significantly more or less yarn than a basic ewrap stich? Thank you!
I would say that it’s a bit more then the eWrap – but it’s much quicker .. I like quickier 🙂
Wonderful video and tutorial. Can you use a heavier weight yarn for this project?
Yes Kelly ! and it will look awesome !
[…] na pletacích kruzích (loom) – největší kolo. Poncho s velkými oky je vzor s názvem Three-step stich a další jsem pletla vzorem Tiny Little Heart. Je asi jedno jaký si vyberete vzor, důležité […]
I am falling in love! These stitches are totally beautiful! ( and when I learn them that will be totally awesome):-)!
Practice makes perfect – I promise 🙂
Hello, I like your three step stich very much. Can we do this on a rectangular loom. Thank you.
Hi Charles I didn’t create this stitch – it was created by Zoe Mclean. I have no idea how this pattern would work as a flat panal or on a double rack loom which is what the rectangular loom is, sorry.
That was my question too…. Has anyone tried to figure it out on a rectangular loom?
I have one question. To get started are you e-wrapping the loom once and then beginning the three step stich? I want to do this but I am curious as how to start the pattern. Thank you.
The start of a project depends on the project. In general a Chain cast-on and a few rows of the Garter Stitch work well with this stitch.
Hello I am bedridden and like to take up a new craft every year this yr looming. Thank you very very much as people like me whilst like watching the video we like some thing written to refer to. I can’t thank you enough for all your great work
Thank you for the Thank you Francisca I really appreciate it !
I love the look & how easy! I wanted to make a cowl on the yellow kk, wat cast on & wat cast off would u use? Tia
The Chain Cast-on and the Basic Bind-off
Hey I was wondering if you have or could do a video of this stick on the long loom…..
Hey Jennifer – Yes but use only one of the two rakes.
Absolutely love the way you just taught that three knitted stitch I will be trying that and thanks again
How would you make this stitch on a rectangular loom. Thanks Brenda
It would have to be single rake.. keeping the end pegs for edges you would slip that first stitch on the way forward and knit that end peg on the end. Do the same thing coming back. Should be in multiples of 3 + 2 .
I would like to make a sweater with the three step stitch but I have to ask how would I end the stitch. im going to start with the arms then the body and how would I connect to make a sweater.
Rachel,
Here is a link of with a picture of a lacy sweater ( I consider the TSS to be a lacy stitch you will have to switch over to a give the edges some type of border to sew them together ). Sonia does two different stitches on the cuffs of the sleeves. The very ends are done in a rib stitch. Click HERE
Hope this helps,
denise
I’m definitely a video learner! thanks for the great tutorial, it is exactly what i have been looking for in regards to a lacy stitch!
You are VERY welcome!
denise 🙂
I am interested in making a shawl. I’m not sure how to increase and decrease the pattern. I looked at project 36 and that’s not much help. If you could please give instructions for doing increase and decrease.
Hi Michelle, sorry for the delay in responding I’ve been ill for a bit. Just trying to catch up.
Hope you’re like me, a visual learner… Below is a link to Jeannie Phillips Increase and Decrease tutorial.
https://www.youtube.com/watch?v=Qh1Pu-AOpPc
I want to make a prayer shawl on a loom using this wonderful stitch; how do I begin for a great edge on top and bottom? Love your videos, so helpful since I neither knit nor crochet!
Hi Carolyn, thanks for the question sorry for the delay. I would suggest you start and end with a Garter Stitch or just a Purl. Here is a simple and basic prayer shawl Scroll Down to Project 36 : Click Here
Thank you!
Hi, I love your videos and site. You are so easy to follow, so patient. Would you cast this off the same way you would any other stitch?
Hey Terri, sorry for the delay – I made a little slochy hat with this stitch – I feel it ends well if you do the last three ways with something like a rib stitch or better yet the by Jeanie Phillips . Click the link for a pattern and a video
denise
I love this!! I make and donate items to The Lydia Project and also to a local Autism Awareness program. Cannot wait to make several of these for them both!! I will be making hats on the round loom and scarves on the flat. thank you , thank you, thank you !!
Nancy, you are soooooooo welcome. I love to hear from folks like you who use these tutorials to help others. Love it Love it Love it !!! Could you please tell me what do you knit for The Lydia Project – and what do you knit for Autism Awareness? I would like for others to be aware of how they can help too.
denise
Just curious I am fairly new to looming but is it possible to do this stitch in a flat panel?
Hi Barbara, Yes you can – a couple of things to keep in mind… a great one is that you don’t need the bottom row to create the one on top. In some stitches it takes more then one row to create the stitch – not so here. But keep in mind that you need three pegs to complete the stitch. So although vertically there is no mandate – there is one horizontally. The rule is THREE PEGS.
Hope that helps
denise
What a beautiful mistake! I am just starting the looming and am completely addicted. I can’t wait to try that stick! Since I am a newbie, I have looked at a LOT of videos and this one was easy to follow, perfectly explained. Thank you so much for sharing this with us!
810 Cxxxxx Xxxxe
Brilliant! Gratitude for another great tutorial! Such a stunning stitch.. Blessings xXx
Thanks for another informative post! I always love to not only see written instructions with pictures, but the videos are the best for me. I’m a visual learner and when you’re a beginner, seeing what to do while reading it, is very helpful. So thanks for being such a great teacher! I love learning new stitches that can be done on a loom!
You are VERY welcome DaFox, always love to hear from you. You’re sooooo sweet. Glad to hear my videos are of help to you.
[…] Para ingles: Haz clic aquí […]
Great tutorial on perfecting an ‘oops’. Love the stitch!
Cheers
Karen